If you've ever dreamed of blending the rich, creamy texture of cheesecake with the bold, luxurious flavor of red velvet cake, then this Red Velvet Cheesecake Recipe is your new best friend. It's gorgeous, no-bake, and just perfect for those moments when you want to wow everyone without turning on the oven.

Jump to:
Why You'll Love This Recipe
Honestly, this red velvet cheesecake quickly became one of my go-to desserts whenever there's a celebration on the horizon. It's indulgent yet delightfully light, and the striking red shade makes it an absolute showstopper!
- Effortless Elegance: No baking required, making it perfect for when you want a fancy dessert without fuss.
- Crunchy Oreo Base: Adds a delicious texture contrast with a subtle chocolatey crunch that everyone loves.
- Vibrant & Creamy Filling: The cream cheese filling tinted with red food coloring is creamy, luscious, and perfectly velvety.
- Beautiful Presentation: Topped with fluffy whipped cream and dark chocolate shavings—it’s a dessert that looks as good as it tastes.
Ingredients & Why They Work
Let me walk you through the core ingredients that make this red velvet cheesecake so special. When you shop for these, try to pick the freshest cream and good-quality cream cheese—you really notice the difference in the final texture and flavor.

- Oreo cookies: Using Oreos for the base gives a rich chocolate crunch that pairs perfectly with the creamy filling.
- Unsalted butter: Melted butter helps bind the cookie crumbs into a sturdy crust.
- Unflavoured gelatine powder: This is what helps the cheesecake set without baking.
- Water: For blooming the gelatin, ensuring smooth incorporation.
- Heavy/thickened cream (for filling and topping): Cold cream whips beautifully to give you that light, airy texture.
- Cream cheese: I recommend softened block-form cream cheese to avoid extra moisture and get that perfect creamy yet firm texture.
- Caster sugar: It dissolves easily, keeping the filling and toppings smooth and sweet without grit.
- Vanilla extract: Adds a warm, aromatic depth to the cheesecake and the topping.
- Dark chocolate (70%): Melting this into the filling adds richness and a hint of bittersweet complexity.
- Red food colouring: Key for achieving that iconic red velvet look—gel or liquid works fine.
- Optional dark chocolate shavings: For topping and garnish, they add a final elegant touch both visually and flavor-wise.
Make It Your Way
One of the joys of making this Red Velvet Cheesecake Recipe is how easy it is to tailor it to your taste and occasion. Whether you want it a bit lighter, more chocolatey, or with a festive twist, there’s room to get creative without losing that iconic red velvet charm.
- Oreo Base Alternatives: If you're not a fan of Oreos or want a slightly different crunch, try swapping the cookie base for crushed graham crackers or ginger snaps for a spiced touch. I once made it with ginger snaps during the holidays, and the warm spice complemented the cream cheese beautifully.
- Dairy-Free Version: For those who prefer dairy-free desserts, try using vegan cream cheese and coconut cream in place of traditional dairy. Just ensure your gelatin substitute (like agar-agar) is suitable for your diet.
- Extra Chocolate Flair: Feeling indulgent? Fold in some white chocolate chips or swirl additional melted dark chocolate on top before chilling for a dramatic marbled effect. I added chocolate chunks once, which gave delightful surprise bites in every slice!
- Festive Flavor Boost: Around holidays, sprinkle a pinch of cinnamon or even a drop of peppermint extract in the filling for a seasonal spin without overpowering the classic flavors.
Step-by-Step: How I Make Red Velvet Cheesecake Recipe

Step 1: Preparing the Pan Base for Easy Removal
Flipping the base of a 20cm (8") springform pan upside down is a little trick that really pays off. It creates a smooth, flat edge that makes releasing the cheesecake simple and neat. Lightly butter the inverted pan base, then press a square of baking paper down firmly. Clip the sides on, letting the excess paper extend beyond the edges—this gives you handy 'handles' to lift the cake out later. Don’t forget to butter and line the pan sides as well to prevent sticking. Taking this extra step upfront sets the stage for a perfect presentation.
Step 2: Creating the Oreo Crunch Base
Crush about 200 grams of Oreo cookies until finely ground — a food processor works best here, but a rolling pin and zip-top bag do the job too. Mix in 60 grams of melted unsalted butter until every crumb is coated. Press this mixture firmly and evenly into the prepared pan base, making sure the surface is compact and level. Pop it into the fridge while you move on to the filling; chilling helps the base set nice and firm, creating that satisfying crunch in every bite.
Step 3: Blooming the Gelatin for Perfect Set
Sprinkle 2 teaspoons of unflavoured gelatin powder over 2 tablespoons of cold water in a small bowl and let it sit for 5 minutes. You’ll notice it swell and become jelly-like—that's blooming! Warm the gelatin gently (either in short bursts in the microwave or over a double boiler) until fully dissolved, but never let it boil — boiling can destroy gelatin's setting power. Set this aside to cool slightly; it will be ready just in time to blend into your cheesecake filling.
Step 4: Melting the Dark Chocolate
Melt 150 grams of 70% dark chocolate gently over a double boiler or in short 20-second bursts in the microwave, stirring between each. It should be smooth, shiny, and just slightly warm to the touch — too hot, and it’ll scramble your cream cheese mixture. Setting it aside to cool slightly before mixing in preserves that silky texture in the cheesecake.
Step 5: Whipping the Cream for a Light Texture
In a chilled bowl, whip 1 cup of cold heavy/thickened cream straight from the fridge to soft peaks — meaning the cream holds shape but still has gentle peaks that curl over when you lift the whisk. This whipped cream is the secret to a luxuriously light filling. Keeping everything cold helps you achieve the best volume and texture.
Step 6: Mixing the Cheesecake Filling
In a large mixing bowl, beat 500 grams of softened block-form cream cheese with ¾ cup caster sugar and 1 teaspoon vanilla extract until smooth and creamy — no lumps here! Next, pour in the melted dark chocolate and stir gently until fully incorporated. Now, for that striking red velvet color, add 6 teaspoons of red food coloring, mixing until the color is vibrant and even. Quickly stir in the dissolved gelatin to ensure the cheesecake sets properly without lumps or streaks.
Step 7: Folding in Whipped Cream
Gently fold your whipped cream into the cheesecake mixture with a spatula — think of it as a delicate hug, not a rough mixing. This preserves the airy texture you whipped into the cream. Mix just until no streaks remain. Over-folding can deflate the cream and make the cheesecake dense, so take your time and be gentle.
Step 8: Assembling and Chilling the Cheesecake
Pour the luscious red velvet filling over your chilled Oreo base, smoothing the top with an offset spatula for a perfect finish. Cover it loosely and chill in the fridge for at least 4 hours, allowing the gelatin to work its magic and the cheesecake to firm up beautifully. For best results, I often make mine the day before—overnight chilling really enhances the texture.
Step 9: Preparing the Whipped Cream Topping
Whip 1¼ cups cold heavy cream with 3 tablespoons caster sugar and 1 teaspoon vanilla extract until stiff peaks form. If you plan to keep the cheesecake out for longer or want extra stability, you can add a stabilizer such as gelatin or a commercial product here. The whipped cream topping adds a lovely light contrast to the rich filling, crowning your cheesecake like a white fluffy cloud.
Step 10: Decorating and Serving
Once your cheesecake is set, gently spread or pipe the whipped cream topping over the surface. Finish with a scattering of shaved or grated dark chocolate—using a potato peeler to create thin curls gives a beautiful, elegant look. Carefully unlock the springform pan sides, using the excess baking paper as handles to lift the cake out smoothly without damaging the edges. Slice into 12 generous pieces and serve chilled for the ultimate decadent experience.
Top Tip
Mastering the Red Velvet Cheesecake Recipe takes a little finesse, but these tips from my own kitchen adventures will help you get it just right every time!
- Use Cold Cream for Whipping: I always chill my heavy cream straight from the fridge before whipping. It whips up faster and holds soft peaks better, making your filling light and airy.
- Softened Block Cream Cheese Only: In earlier attempts, I used whipped cream cheese which added unwelcome moisture. Stick to softened block form for the perfect creamy yet firm texture.
- Don’t Skip the Inverted Pan Base: Flipping the springform pan base makes cheesecake removal a breeze. It keeps the edges smooth without tearing the delicate crust or filling.
- Red Food Coloring Matters: I learned that gel or liquid red coloring works fine, but the right amount (6 tsp) is essential to get that gorgeous, true red velvet hue that wows everyone.
How to Serve Red Velvet Cheesecake Recipe

Garnishes
For an elegant finish, I love topping my cheesecake with freshly whipped cream lightly sweetened with caster sugar and vanilla extract. A generous sprinkle of dark chocolate shavings adds a sophisticated contrast both in color and texture. You can also add fresh raspberries or a dusting of cocoa powder for extra flair.
Side Dishes
This Red Velvet Cheesecake pairs wonderfully with fresh berries or a mixed berry compote to balance its rich chocolate flavors. A dollop of homemade vanilla bean ice cream or a light espresso also complements the creamy, decadent dessert beautifully for a memorable finish.
Make Ahead and Storage
Storing Leftovers
Store your red velvet cheesecake in the fridge, covered loosely with plastic wrap or in an airtight container. It will keep fresh and delicious for up to 3 days. Keeping it chilled helps maintain the cheesecake’s creamy texture and beautiful shape.
Freezing
If you want to freeze leftovers, slice the cheesecake first. Wrap each slice individually in plastic wrap and then place them in a freezer-safe container. Frozen cheesecake slices last up to 1 month. When ready to enjoy, thaw overnight in the fridge for the best texture.
Reheating
Since this is a no-bake cheesecake, reheating is not required. Simply serve chilled straight from the fridge or after thawing from frozen. Avoid leaving it at room temperature for long periods to keep it fresh and safe.
Frequently Asked Questions:
Absolutely! While the Oreo cookie base gives a delightful crunch and flavor contrast, you can substitute it with graham cracker crust or digestive biscuits if preferred.
Both gel and liquid red food coloring work well. I recommend gel coloring for a more vibrant and controlled color without altering the filling's consistency.
This recipe relies heavily on dairy for its creamy texture, so substituting all dairy ingredients can be challenging. However, you might experiment with dairy-free cream cheese and cream alternatives – just be aware it will change the texture and flavor.
The cheesecake needs at least 4 hours of chilling time in the fridge to properly set, but I highly recommend chilling it overnight for the best texture and flavor development.
Final Thoughts
This Red Velvet Cheesecake Recipe is truly a showstopper that brings festive color and elegant flavor to your dessert table without the fuss of baking. Its creamy, chocolatey filling and crunchy Oreo base make every bite a delight. I hope these tips and serving ideas inspire you to create this special dessert for your next celebration – it’s always a crowd-pleaser that feels as indulgent as it looks. Happy baking (or rather, no baking), and most of all, enjoy every luscious slice!
Print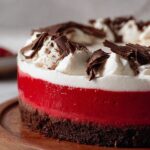
Red Velvet Cheesecake Recipe
- Prep Time: 30 minutes
- Chilling Time: 4 hours
- Cook Time: 0 minutes
- Total Time: 4 hours 30 minutes
- Yield: 12 servings 1x
- Category: Dessert
- Method: No-Cook
- Cuisine: American
- Diet: Vegetarian
Description
A stunning no-bake red velvet cheesecake that combines the rich, creamy texture of cheesecake with the bold, striking color and flavor of red velvet cake. This dessert features a crunchy Oreo cookie base, a luscious cream cheese filling tinted with red food coloring, and is topped with whipped cream and dark chocolate shavings. Perfect for impressing guests at any special occasion.
Ingredients
Base
- 200g Oreo cookies (1.5 standard packs)
- 60g unsalted butter, melted
Gelatin Mixture
- 2 tsp unflavoured gelatine powder
- 2 tbsp water
Cheesecake Filling
- 1 cup heavy/thickened cream, cold from fridge
- 500g cream cheese, softened (block form)
- ¾ cup caster sugar
- 1 tsp vanilla extract
- 150g 70% dark chocolate
- 6 tsp red food colouring
Whipped Cream Topping
- 1 ¼ cups heavy/thickened cream, cold from fridge
- 3 tbsp caster sugar
- 1 tsp vanilla extract
- Optional: 2 tablespoon shaved or grated dark chocolate (for garnish)
Instructions
- Prepare pan base: Flip the base of a 20cm (8") springform pan upside down to make removal easier. Lightly butter the pan base and press a square sheet of baking paper onto it. Clip the pan sides to the base letting excess paper stick out for easy removal later. Butter and line the pan sides with baking paper as well.
- Make the base: Crush Oreo cookies finely, mix with melted butter until combined. Press firmly and evenly onto the base of the prepared pan. Chill in the fridge while preparing the filling.
- Bloom gelatin: In a small bowl, sprinkle gelatine powder over 2 tablespoon water and let it bloom for 5 minutes, then gently warm until fully dissolved (do not boil). Set aside.
- Prepare chocolate: Melt 150g dark chocolate gently over a double boiler or in short bursts in the microwave. Let it cool slightly but stay liquid.
- Whip cream for filling: In a chilled bowl, whip 1 cup cold heavy cream to soft peaks and set aside.
- Make cheesecake mixture: In a large bowl, beat softened cream cheese with caster sugar and vanilla extract until smooth and creamy. Add melted chocolate and red food coloring and mix until evenly combined. Stir in dissolved gelatine quickly to incorporate.
- Fold whipped cream: Gently fold whipped cream into the cream cheese mixture until fully combined without deflating the cream.
- Assemble cheesecake: Pour the filling over the chilled Oreo base in the springform pan, smoothing the top. Chill in the fridge for at least 4 hours or until set.
- Prepare topping: Whip 1 ¼ cups cold heavy cream with caster sugar and vanilla extract until stiff peaks form. Optionally, add stabilizer to help hold shape.
- Decorate: Once cheesecake has set, spread or pipe whipped cream over the top and garnish with shaved or grated dark chocolate.
- Serve: Carefully remove sides of springform pan using excess paper as handles. Slice into 12 pieces and serve chilled.
Notes
- The red food coloring is crucial to achieve the signature red velvet color; gel or liquid red coloring can be used.
- Using cold cream straight from the fridge helps achieve better volume when whipping.
- Softened cream cheese should be block form to avoid excess moisture, resulting in a firmer texture.
- If you want the whipped cream topping to hold longer, you can add a stabilizer like gelatin or a commercial product.
- The Oreo base adds a flavorful crunch, but graham cracker crust may be used as an alternative if preferred.
- This cheesecake needs at least 4 hours chilling to set properly before serving; overnight chilling is recommended for best results.
- Use an inverted springform pan base to make cheesecake removal easier without damaging the edges.
Nutrition
- Serving Size: 1 slice
- Calories: 540 kcal
- Sugar: 29 g
- Sodium: 210 mg
- Fat: 43 g
- Saturated Fat: 25 g
- Unsaturated Fat: 14 g
- Trans Fat: 0.2 g
- Carbohydrates: 37 g
- Fiber: 2 g
- Protein: 6 g
- Cholesterol: 103 mg


Leave a Reply