If you’re craving a snack that’s irresistibly crunchy on the outside with a savory, umami-packed filling inside, you’ve got to try this Crispy Chicken Spring Rolls Recipe. Trust me, these golden delights will have everyone asking for seconds!

Jump to:
Why You'll Love This Recipe
I could seriously snack on these homemade spring rolls any day of the week. What’s not to love? The filling blends ground chicken with shiitake mushrooms and fresh veggies, all wrapped in perfectly thin, flour-based wrappers that crisp up beautifully.
- Ultimate Crispiness: Using flour-based spring roll wrappers delivers that light, crunchy texture you want, especially when fried.
- Flavorful Filling: Ground chicken combined with savory mushrooms and fresh herbs creates an incredibly satisfying bite.
- Sweet & Tangy Dipping Sauce: A honey-based sauce with a spicy kick perfectly complements the rich spring rolls.
- Versatile Cooking: Prefer air frying? No worries — you’ll still get tasty rolls with less oil, just not quite as crispy.
Ingredients & Why They Work
Gathering the right ingredients is key to nailing the perfect spring roll texture and flavor. I love using fresh veggies and authentic rice vermicelli for that delightful bite, and choosing the right wrappers makes frying a breeze.

- Avocado oil: Adds a subtle, neutral flavor and can handle high frying temperatures without smoking.
- Toasted sesame oil: Infuses the filling with that signature nutty aroma we all crave.
- Garlic: Freshly minced for robust flavor that wakes up the palate.
- Shallot: Offers a mild, sweet onion flavor that blends beautifully.
- Green onions: For an extra punch of freshness and crunch.
- Shiitake mushrooms: Their meaty texture and earthy taste elevate the filling tremendously.
- Cabbage: Adds a lovely crunch and balances the richness.
- Carrot: For natural sweetness and vibrant color.
- Cilantro: Fresh and herbaceous, brightening the whole mix.
- Ground chicken: The lean protein base that absorbs all the delicious flavors.
- Oyster sauce: Brings that deep, savory umami note.
- Fine sea salt: Enhances every ingredient without overpowering.
- Thin rice noodles (vermicelli noodles): Adds subtle texture and tradition to the filling.
- Large egg: Used as an egg wash to seal the wrapper edges perfectly.
- Square spring roll wrappers: Flour-based lumpia wrappers are essential for crispiness — avoid rice paper ones.
- Basil or Thai basil leaves (optional): Adds an aromatic layer if you feel fancy.
- Peanut oil: Perfect for frying thanks to its high smoke point and neutral taste.
- Honey and spices for dipping sauce: The sweet, tangy, and slightly spicy sauce pulls this whole dish together.
Make It Your Way
One of the best parts about this Crispy Chicken Spring Rolls Recipe is how easy it is to tweak things to suit your tastes or dietary needs. Whether you want to add more herbs, swap proteins, or lighten things up, these spring rolls invite your own personal touch.
- Variation: For a vegetarian twist, substitute the ground chicken with crumbled firm tofu or cooked lentils, and use vegetable oyster sauce or soy sauce instead. I tried this once for a family gathering and was surprised at how well the mushrooms and tofu made a savory, satisfying filling!
- Seasonal Boost: When spring arrives, try adding fresh mint or shredded snap peas into the mix for an extra pop of freshness. It brightens the rolls beautifully and adds an unexpected crunch.
- Spice It Up: Love heat? Mix a little extra Gochujang or freshly diced chili into the filling or the dipping sauce. I like to add a dash of chili flakes for that subtle kick without overpowering the umami flavors.
- Lighter Option: Air frying the rolls is a great alternative to deep frying if you’re watching calories or just want a less oily snack. While the texture isn’t quite as crisp, it’s still delicious and perfect when you want to keep things quick and light.
Step-by-Step: How I Make Crispy Chicken Spring Rolls Recipe

Step 1: Prep Your Veggies and Aromatics
Start by mincing the garlic and shallot finely—they build a fragrant base. Thinly slice the green onions, finely chop the shiitake mushrooms, and shred the cabbage. Grate the carrot and chop fresh cilantro. Having all your veggies ready before you start cooking will keep the process smooth and stress-free.
Step 2: Sauté Mushrooms and Aromatics to Perfection
Heat 2 tablespoons of avocado oil and 1 tablespoon of toasted sesame oil in a large skillet over medium-high heat. Add the minced garlic, shallot, sliced green onions, and shiitake mushrooms. Stir frequently for about 8 minutes until the mushrooms soften, reduce, and start to brown slightly—this develops a lovely umami flavor that’s key to the filling.
Step 3: Cook and Season the Ground Chicken
Push the mushroom mixture to one side and add the pound of ground chicken to the skillet. Break it into small crumbles with your spatula as it cooks. When the chicken has lost all its pinkness and is cooked through, stir in 2 tablespoons oyster sauce and 1 teaspoon fine sea salt. Cook for an additional 2 minutes to blend the flavors. Then remove from heat and let it cool to room temperature—this step ensures the filling mixes well later on.
Step 4: Soften and Prepare the Rice Noodles
Place 2 ounces of thin rice noodles (vermicelli) in a heatproof bowl and cover them with boiling water. Let sit for 3 minutes until tender, then drain well. Cut the noodles roughly in half; this helps them disperse evenly in the filling instead of clumping.
Step 5: Combine All Filling Ingredients
In a large mixing bowl, combine the shredded cabbage, grated carrot, chopped cilantro, the cooled chicken and mushroom mixture, and the prepared noodles. Use your hands or a fork to mix everything thoroughly, gently pulling apart any noodle clusters so the filling is uniform and ready for rolling.
Step 6: Whisk Your Egg Wash
Crack 1 large egg into a small bowl and whisk until fully blended. This egg wash will help seal your spring roll wrappers tightly so none of that wonderful filling escapes during frying.
Step 7: Wrap Those Spring Rolls
Open your package of flour-based square spring roll wrappers and cover them with a damp paper towel to keep them soft and easy to handle. Work with one wrapper at a time: place it on your surface in a diamond shape with the point facing you. If you like, place 1 to 2 basil leaves across the bottom third for a fresh herbal note. Spoon a small mound of filling onto the basil (or directly on the wrapper if you’re skipping the herbs). Brush egg wash lightly along all four edges of the wrapper.
Step 8: Roll Up Tight and Neat
Fold the bottom corner over the filling, pulling it snugly to form the start of your roll. Next, fold the left and right sides in, like closing an envelope flap. Keep rolling tightly upward, away from you, until you reach the top corner. Seal the edge with a brush of egg wash. Place the finished roll on a tray covered with a damp paper towel and repeat with the rest of the wrappers and filling. Keeping the rolls covered prevents them from drying out and tearing.
Step 9: Fry Until Golden and Crispy
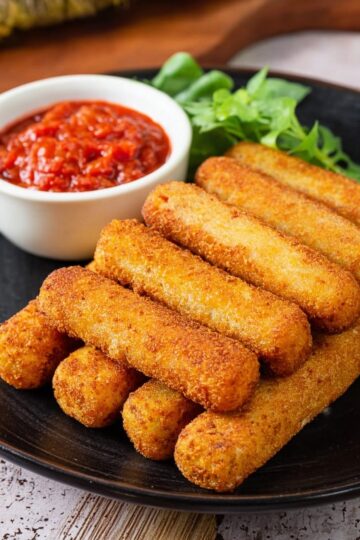
Heat 4 cups of peanut oil in a deep pot or fryer to 350°F (177°C). Make sure the oil level leaves plenty of space to avoid spills. Carefully add 2 to 4 spring rolls at a time and fry for 4 to 5 minutes until they turn a gorgeous golden brown. Transfer to a wire rack to drain and cool slightly. Repeat with the remaining rolls. The smell as they fry is pure heaven!
Step 10: Air Frying Alternative
If you prefer to air fry, preheat your air fryer to 390°F (198°C). Lightly spray the basket with cooking spray to prevent sticking. Arrange the rolls in a single layer and cook for 10 to 15 minutes until crispy. They won’t be quite as crunchy as deep-fried, but it’s definitely a lighter, hassle-free option.
Step 11: Whip Up the Perfect Dipping Sauce
In a small bowl, combine 6 tablespoons honey, 1 tablespoon oyster sauce, 1 teaspoon Chinese mustard, 1 teaspoon Gochujang, and 1 teaspoon rice wine vinegar. Stir thoroughly until integrated. This sweet and tangy sauce pairs beautifully with the savory crunch of the spring rolls and should be served alongside for dipping.
Top Tip
Making crispy chicken spring rolls at home can seem tricky at first, but these tips will help you get that perfect crunch and flavor every time. A little attention to detail transforms this recipe from good to unforgettable!
- Keep Wrappers Moist: Always cover your spring roll wrappers with damp paper towels while working. This prevents them from drying out and tearing, which was a lifesaver for me during my first try!
- Cut Noodles Small: Rice vermicelli tends to clump; cutting them roughly into halves before mixing helps evenly distribute them through the filling for consistent texture.
- Tight Rolling Technique: Pull the wrapper snug while folding around the filling. This makes frying easier and keeps your rolls from unraveling mid-cook.
- Oil Temperature Consistency: Maintaining the peanut oil at 350°F ensures a golden, crispy exterior without absorbing excess oil—something I learned after a less-than-crispy attempt.
How to Serve Crispy Chicken Spring Rolls Recipe

Garnishes
Fresh herbs like Thai basil or cilantro leaves add a lovely burst of fragrance and color when sprinkled on the plate. For a little extra zing, a few thin slices of fresh red chili or green onion rings garnish beautifully. Don't forget the dipping sauce on the side—it perfectly complements the crunch and umami flavors of these spring rolls!
Side Dishes
These spring rolls shine as appetizers or snacks, but pairing them with simple sides like steamed jasmine rice or a crisp Asian slaw enhances the meal. Light cucumber salad or pickled vegetables also provide a refreshing contrast that'll keep every bite exciting.
Make Ahead and Storage
Storing Leftovers
Store any leftover spring rolls in an airtight container in the refrigerator for up to 2 days. To maintain their crispiness, I recommend reheating them in the oven or air fryer rather than the microwave.
Freezing
If you want to prepare ahead, fully cooked spring rolls freeze beautifully. After frying or air frying, freeze them on a parchment-lined tray until firm (1 to 2 hours), then transfer to airtight bags or containers and store for up to 3 months.
Reheating
To reheat frozen spring rolls, bake in a 375°F oven for 15 to 20 minutes or air fry at 375°F for 6 to 12 minutes until heated through and crisp. This method revives the delicious crunch without drying them out.
Frequently Asked Questions:
I don’t recommend rice paper wrappers for this Crispy Chicken Spring Rolls Recipe because they don’t fry up with the same crispiness and can become chewy or soggy. Flour-based, square spring roll wrappers (like lumpia wrappers) give you the ideal crunchy texture.
Yes! Air frying is a great option if you want to avoid deep frying. Preheat your air fryer to 390°F and cook for 10 to 15 minutes. The rolls won’t be quite as crispy as when fried in oil, but they still taste delicious.
Keep the wrappers covered with damp paper towels while working with them to prevent drying out, which makes tearing more likely. If a tear does occur, simply overlap another part of the wrapper over it while rolling — it seals nicely.
Absolutely! The filling can be made up to 2 days in advance and stored in an airtight container in the fridge. This saves time on the day you want to assemble and fry the spring rolls.
Final Thoughts
Nothing beats the joy of biting into a perfectly crispy, flavorful spring roll made from scratch. I hope this Crispy Chicken Spring Rolls Recipe brings a little sparkle to your table and impresses your family or guests. Don’t be afraid to get creative with garnishes or try the air fryer method if you prefer a lighter bite. Most important of all—have fun making them and savor every crunchy, delicious moment!
Print
Crispy Chicken Spring Rolls Recipe
- Prep Time: 45 minutes
- Cook Time: 15 minutes
- Total Time: 1 hour
- Yield: 18 servings 1x
- Category: Appetizer
- Method: Frying
- Cuisine: Asian
Description
These crispy homemade spring rolls feature a flavorful ground chicken and shiitake mushroom filling combined with fresh vegetables and thin rice noodles, wrapped in delicate flour-based spring roll wrappers. Perfectly fried until golden and served with a sweet and tangy honey-based dipping sauce, they offer a crunchy texture and rich umami taste. For a lighter option, air frying is possible though the rolls will be less crispy. Ideal as an appetizer or snack to impress family and guests.
Ingredients
Spring Rolls
- 2 tablespoons avocado oil
- 1 tablespoon toasted sesame oil
- 5 cloves garlic, minced
- 1 medium shallot, minced
- 2 green onions, sliced thin
- 6 ounces (170g) shiitake mushrooms, stems removed and finely chopped (about 2 cups)
- 1 cup finely shredded cabbage
- ½ cup grated carrot
- ½ cup chopped cilantro
- 1 pound (450g) ground chicken
- 2 tablespoons oyster sauce
- 1 teaspoon fine sea salt
- 2 ounces thin rice noodles (vermicelli noodles)
- 1 large egg for egg wash
- 1 (12 oz) package square spring roll wrappers (lumpia wrappers, flour-based, not rice paper)
- Basil or Thai basil leaves, optional
- 4 cups peanut oil (for frying)
Spring Roll Sauce
- 6 tablespoons honey
- 1 tablespoon oyster sauce
- 1 teaspoon Chinese mustard
- 1 teaspoon Gochujang (Korean fermented chili paste)
- 1 teaspoon rice wine vinegar
Instructions
- Prepare Vegetables: Mince garlic, shallot; thinly slice green onions; finely chop shiitake mushrooms; shred cabbage; grate carrot; chop cilantro. Have these ready before cooking.
- Cook Mushrooms and Aromatics: Heat avocado oil and toasted sesame oil in a large skillet over medium-high heat. Add garlic, shallot, green onions, and shiitake mushrooms. Cook while stirring often for about 8 minutes until mushrooms reduce and begin to brown.
- Add and Cook Ground Chicken: Add ground chicken to the skillet, breaking it into small crumbles. Cook until no longer pink and cooked through. Stir in oyster sauce and sea salt, cook for 2 more minutes. Remove from heat and let cool to room temperature.
- Prepare Noodles: Place rice noodles in a bowl and cover with boiling water. Let soak for 3 minutes until tender. Drain and cut noodles roughly in half for easier mixing.
- Make Filling: In a large bowl, combine cabbage, carrot, cilantro, noodles, and cooled chicken-mushroom mixture. Mix thoroughly, separating noodles so they are evenly distributed throughout the filling.
- Make Egg Wash: Crack egg into a small bowl and whisk until blended. Set aside for sealing rolls.
- Prepare Wrappers: Keep spring roll wrappers covered with damp paper towels to prevent drying. Work with one wrapper at a time.
- Assemble Spring Rolls: Place one wrapper on work surface in diamond shape, corner pointing toward you. If using, lay 1-2 basil leaves on bottom third of wrapper. Spoon filling onto basil or directly on wrapper, forming a small mound centered at bottom third. Lightly brush egg wash on all four edges of wrapper.
- Roll Spring Rolls: Fold bottom corner over filling, pulling back to make a snug roll. Fold left and right sides inward like an envelope flap. Continue rolling upward tightly and seal the top corner with egg wash.
- Set Aside Rolls: Place rolled spring rolls on a tray and cover with damp paper towels to prevent drying. Repeat rolling with remaining wrappers and filling.
- Fry Spring Rolls: Heat peanut oil in a deep pot to 350°F (177°C), leaving enough space to avoid overflow. Fry 2 to 4 rolls at a time, cooking 4 to 5 minutes until golden brown. Remove and drain on wire rack. Repeat with remaining rolls.
- Alternative Air Frying: Preheat air fryer to 390°F (198°C). Lightly spray air fryer basket. Air fry spring rolls for 10 to 15 minutes until crispy, though less crispy than frying.
- Make Dipping Sauce: In a small bowl, combine honey, oyster sauce, Chinese mustard, Gochujang, and rice wine vinegar. Stir well and serve alongside spring rolls.
Notes
- Use flour-based square spring roll or lumpia wrappers for best crispiness; avoid rice paper wrappers as they don't fry well.
- Rice vermicelli noodles work best; cut them roughly to prevent clumping.
- Make filling up to 2 days ahead and store in an airtight container in the refrigerator.
- For freezing, freeze cooked rolls on a parchment-lined tray until firm, then store in airtight bags for up to 3 months. Reheat in oven at 375°F for 15-20 minutes or air fry at 375°F for 6-12 minutes.
- If frying at home, consider using an electric fryer like Fry Daddy for easy and safe frying.
- Keep wrappers covered with damp towels to avoid drying and tearing. If a tear occurs, cover it during rolling to seal properly.
- The nutrition facts exclude frying oil as amounts vary based on method.
Nutrition
- Serving Size: 1 spring roll
- Calories: 150 kcal
- Sugar: 4 g
- Sodium: 300 mg
- Fat: 6 g
- Saturated Fat: 1 g
- Unsaturated Fat: 5 g
- Trans Fat: 0 g
- Carbohydrates: 15 g
- Fiber: 1.5 g
- Protein: 8 g
- Cholesterol: 35 mg


Leave a Reply