If you’re craving that perfect harmony of crunchy, golden crust and juicy, flavorful chicken, then this Crispy Buttermilk Fried Chicken Recipe is exactly what you need. It’s the kind of Southern comfort food that feels like a warm hug on a plate and always hits the spot.

Jump to:
Why You'll Love This Recipe
I honestly can’t get enough of this fried chicken. The buttermilk marinade makes the chicken incredibly tender and juicy, while the crispy coating gives that satisfying crunch we all crave. Plus, it’s easier to make than you might think!
- Tender & Juicy: Marinating the chicken in tangy buttermilk breaks down proteins for juicy, flavorful bites every time.
- Perfectly Crispy: Coated in self-rising flour and fried in peanut oil for an unbeatable golden crust.
- Simple Ingredients: Uses pantry staples you probably already have on hand.
- Versatile Serving: Serve it straight up or with gravy or your favorite sauce for extra indulgence.
Ingredients & Why They Work
When it comes to fried chicken, quality ingredients make all the difference. Here’s a quick rundown of what you’ll need and why each one plays an important role in this recipe.

- Whole chicken (bone-in, skin-on): Using bone-in pieces with skin keeps the meat juicy and helps lock in flavor while frying.
- Kosher salt: Essential for seasoning and bringing out the natural taste of the chicken.
- Black pepper: Adds subtle heat and depth to the poultry.
- Full fat buttermilk: The star of the marinade—its acidity tenderizes and imparts a tangy flavor that’s classic Southern fried chicken.
- Self-rising flour: This creates a light, crispy coating that clings beautifully to the chicken.
- Peanut oil (or vegetable oil): Ideal for frying thanks to its high smoke point and neutral flavor, ensuring a perfectly golden crust.
Make It Your Way
The beauty of this Crispy Buttermilk Fried Chicken Recipe is how easily you can make it your own. Whether you want to add an extra kick of spice or try a different flour for the coating, there’s plenty of room for personalization without sacrificing that signature crispy crust and juicy inside.
- Spicy Variation: For those who love a bit of heat, try adding 1 teaspoon of cayenne pepper or smoked paprika to the self-rising flour before dredging. I love how this gives the chicken a subtle warmth that complements the tangy buttermilk perfectly.
- Gluten-Free Twist: Swap out self-rising flour for a gluten-free flour blend mixed with 1 teaspoon of baking powder and a pinch of salt. It still crisps up nicely and keeps the flavor intact for those with gluten sensitivities.
- Herb-Infused Marinade: Toss in some fresh thyme, rosemary, or garlic cloves into the buttermilk marinade. I’ve found that these fresh herbal notes create an aromatic layer that really elevates the classic Southern fried chicken flavor.
- Oil Alternatives: While peanut oil is ideal for its high smoke point and mild flavor, vegetable oil or canola oil work perfectly as budget-friendly options without compromising on crispiness.
Step-by-Step: How I Make Crispy Buttermilk Fried Chicken Recipe

Step 1: Perfectly Marinate the Chicken
Start by seasoning your chicken pieces evenly with kosher salt and black pepper, then submerge them in full-fat buttermilk. I find that letting the chicken soak for at least 2 hours in the fridge—though overnight is best—makes a world of difference. The tangy buttermilk breaks down proteins and locks in moisture, ensuring every bite is tender and flavorful.
Step 2: Coat Each Piece in Flour
Once your chicken has soaked up that buttermilk goodness, let any excess drip off before coating. Dredge each piece in self-rising flour, making sure the coating covers every nook and cranny. This step builds the foundation for that crave-worthy crispy crust we’re after. Pro tip: Discard leftover buttermilk to avoid thinning out your flour coating.
Step 3: Heat Your Oil to the Sweet Spot
Pour peanut oil into a heavy cast iron skillet or braiser so it’s about 1 ½ inches deep. Heat the oil to between 360°F and 375°F. Maintaining this temperature is crucial: too low and your coating will soak up oil; too high and it’ll burn before the inside cooks. I usually keep a thermometer nearby to keep things steady.
Step 4: Fry in Batches without Crowding
Add your chicken pieces carefully into the hot oil — I like to do about half my pieces at a time. Crowding the pan drops the oil temperature and results in a soggy crust we definitely don’t want. Cover and fry for 6 minutes to start forming that golden crust.
Step 5: Crisp & Cook Through
After the initial 6 minutes, uncover to brown the top and cook for 9 more minutes. Then gently flip the chicken over, cover, and cook for 6 minutes on the other side. Finally, uncover again and continue frying for 5 to 9 minutes, turning occasionally during the last 3 minutes to ensure even browning. The crust should be an irresistible golden brown and the chicken should reach an internal temperature of 165°F for safe, juicy perfection.
Step 6: Drain, Season, and Rest
Using tongs, transfer your crispy chicken to paper towels to soak up excess oil. If you like, sprinkle flaky sea salt over the hot chicken to enhance that flavor burst. Let the chicken rest for 5 to 10 minutes; this little pause lets the juices redistribute, leaving you with moist, tender bites.
Step 7: Serve and Enjoy!
Serve your Crispy Buttermilk Fried Chicken hot with gravy or your favorite dipping sauce—Alabama White Sauce is a personal favorite I highly recommend trying. Whether for a family dinner or a weekend treat, this recipe hits all the right notes for classic Southern comfort food done just right.
Top Tip
Mastering this Crispy Buttermilk Fried Chicken Recipe is all about attention to detail. These tips can help you get that perfect golden crust and juicy inside every time.
- Marinate Overnight: I’ve found that letting the chicken soak in buttermilk overnight really works wonders for tenderness and flavor. Don’t rush this step!
- Maintain Oil Temperature: Through trial and error, I learned that keeping the oil steady between 360°F and 375°F is crucial. Too hot, and the crust burns; too cool, and the chicken gets greasy.
- Use a Heavy Skillet: A cast iron skillet is my go-to. Its even heat distribution keeps the chicken cooking evenly and crisply.
- Avoid Crowding: Overfilling the pan drops the oil temperature, leading to soggy, greasy chicken. Fry in batches for the best crunch.
How to Serve Crispy Buttermilk Fried Chicken Recipe

Garnishes
Keep it simple and classic with flaky sea salt sprinkled right after frying to enhance the flavor. Fresh herbs like chopped parsley or thyme brighten things up, or add a tangy kiss with a drizzle of Alabama White Sauce or a side of hot honey for a sweet-spicy contrast.
Side Dishes
Southern staples pair beautifully with your crispy buttermilk fried chicken. Think creamy mashed potatoes with gravy, buttery cornbread, collard greens, or a refreshing coleslaw for crunch and acidity. Mac and cheese or baked beans also round out the meal perfectly.
Make Ahead and Storage
Storing Leftovers
Let your fried chicken cool completely, then store in an airtight container in the refrigerator. It will keep well for up to 3 days. This makes it easy to enjoy your Crispy Buttermilk Fried Chicken Recipe all week long without losing that delightful crispiness too quickly.
Freezing
To freeze, first cool the chicken completely, then wrap each piece tightly in plastic wrap and place them in a freezer-safe container or bag. Frozen fried chicken keeps well for up to 2 months. Just be sure to thaw it in the fridge overnight before reheating.
Reheating
For best results, reheat leftover chicken in a preheated oven at 350°F for about 15-20 minutes, turning once halfway through. This helps revive the crispy coating without drying out the juicy meat inside. Avoid microwaving to keep it crispy!
Frequently Asked Questions:
Skin-on chicken is best for Crispy Buttermilk Fried Chicken because the skin crisps up beautifully during frying. Skinless pieces tend to be less crispy and less flavorful.
Buttermilk tenderizes the chicken and adds a subtle tang that enhances flavor. It also helps the flour coating stick better, resulting in that signature crispy crust.
You can make your own by combining 1 cup all-purpose flour with 1 ½ teaspoons baking powder and ¼ teaspoon salt. This substitute works well for the coating.
Use an instant-read thermometer to check that the internal temperature reaches 165°F. This ensures the chicken is fully cooked and safe to eat while keeping it juicy inside.
Final Thoughts
There’s something truly comforting about a well-made Crispy Buttermilk Fried Chicken Recipe — that perfect crunch paired with tender, juicy meat is hard to beat. With a little patience and care, you’ll have a delicious Southern classic ready to impress your family and friends every time. So gather your ingredients, fire up that skillet, and savor every bite of homemade goodness. Happy cooking!
Print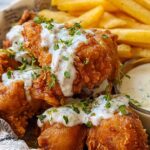
Crispy Buttermilk Fried Chicken Recipe
- Prep Time: 15 minutes
- Marinating Time: 2 hours
- Cook Time: 30 minutes
- Total Time: 2 hours 45 minutes
- Yield: 4 servings 1x
- Category: Main Course
- Method: Frying
- Cuisine: Southern American
Description
This classic buttermilk fried chicken recipe delivers crispy, flavorful chicken with a tender, juicy interior. Marinated in tangy buttermilk, coated with self-rising flour, and fried to golden perfection in peanut oil, this Southern comfort dish is a go-to for any meal. Perfectly seasoned and easy to make, it's delicious served with gravy or your favorite sauce.
Ingredients
Chicken and Marinade
- 3 to 4 pound whole chicken, bone-in, skin-on, pre-cut pieces
- 1 teaspoon kosher salt
- 1 teaspoon black pepper
- 2 cups full fat buttermilk
Coating
- ¾ to 1 ¼ cups self-rising flour
For Frying
- Peanut oil (or vegetable oil), enough for 1 ½-inch depth frying
Instructions
- Prepare the Chicken: Place the chicken pieces in a large bowl. Sprinkle evenly with kosher salt and black pepper, tossing several times to coat all pieces well. Pour in the buttermilk and stir to coat the chicken thoroughly. Cover the bowl with plastic wrap and refrigerate for at least 2 hours, preferably overnight, to marinate.
- Coat the Chicken: Remove the chicken from the buttermilk, allowing any excess to drip back into the bowl. Dredge each piece in self-rising flour until fully coated. Discard the leftover buttermilk.
- Heat the Oil: Pour peanut oil into a heavy cast iron skillet or braiser to a depth of about 1 ½ inches. Heat the oil to a temperature between 360°F and 375°F, adjusting your heat source as necessary to maintain this temperature throughout frying.
- Fry the Chicken in Batches: Add chicken pieces to the hot oil in batches, avoiding overcrowding the skillet. Cover and cook for 6 minutes. Then uncover and cook for an additional 9 minutes.
- Turn and Continue Cooking: Flip the chicken pieces over carefully. Cover again and cook for 6 minutes, then uncover and cook for another 5 to 9 minutes. During the last 3 minutes, turn the pieces occasionally to ensure even browning on all sides.
- Check for Doneness and Drain: Use an instant-read thermometer to confirm the chicken reaches an internal temperature of 165°F. Remove the chicken from the oil with tongs and place on paper towels to drain excess oil. Repeat the frying process with remaining chicken pieces.
- Rest and Serve: Allow the fried chicken to rest for 5 to 10 minutes before serving. Season with flaky sea salt while still hot if desired. Serve hot with gravy or your favorite sauces, such as Alabama White Sauce.
Notes
- Marinating the chicken overnight in buttermilk increases tenderness and flavor.
- Use a heavy cast iron skillet for even heat distribution and better frying results.
- Do not overcrowd the pan during frying to maintain oil temperature and crispiness.
- Adjust frying time slightly depending on the size of your chicken pieces.
- Use an instant-read thermometer to ensure the chicken is safely cooked to 165°F internal temperature.
- Peanut oil provides a high smoke point and mild flavor, but vegetable oil can be substituted if needed.
- Resting the chicken after frying helps retain juices and keeps it tender.
Nutrition
- Serving Size: 1 serving
- Calories: 540 kcal
- Sugar: 6 g
- Sodium: 822 mg
- Fat: 29 g
- Saturated Fat: 9 g
- Unsaturated Fat: 17 g
- Trans Fat: 0.2 g
- Carbohydrates: 29 g
- Fiber: 1 g
- Protein: 38 g
- Cholesterol: 136 mg


Leave a Reply