When you’re craving a sweet, crunchy treat that’s super easy to make, this Butterfinger Peanut Butter Balls Recipe is exactly what you need. Creamy peanut butter, crunchy Butterfinger bars, and a silky chocolate coating come together to create the perfect no-bake snack that’s sure to impress.

Jump to:
Why You'll Love This Recipe
I absolutely adore these Butterfinger Balls because they’re so quick to whip up, yet taste like you spent hours on them. Perfect for holiday parties or just a fun snack to share with friends—isn’t that what easy recipes are all about?
- Simple no-bake process: No oven? No worries—these come together quickly using just your mixer and freezer.
- Perfect balance of flavors: Sweet peanut butter meets crunchy Butterfinger chips, encased in smooth chocolate.
- Customizable toppings: Dress them up with sprinkles, sea salt, or more crushed Butterfingers for extra flair.
- Great for make-ahead treats: Freeze them and pull out whenever you need a quick grab-and-go snack.
Ingredients & Why They Work
To get these Butterfinger Peanut Butter Balls just right, using the right ingredients makes all the difference. Stick with regular creamy peanut butter—not natural varieties that tend to separate—to get that perfect smooth texture in your mixture.

- Butter: Softened for easy creaming with the peanut butter, giving a rich, smooth base.
- Vanilla extract: Adds a subtle warmth and depth to the flavor.
- Peanut butter: Creamy style works best for smooth mixing without graininess.
- Powdered sugar: Sweetens and firms up the mixture for easy rolling.
- Graham cracker crumbs: Provide a gentle crunch and a hint of honey flavor.
- Crushed Butterfinger bars: The star ingredient for that irresistible, crispy candy texture inside.
- Chocolate bark or chocolate chips: Used to coat the balls for a luscious finish.
- Optional toppings: Extra crushed Butterfingers, festive sprinkles, or coarse sea salt make these look as good as they taste.
Make It Your Way
One of the best things about this Butterfinger Peanut Butter Balls Recipe is how easy it is to tweak and make completely your own. Whether you want to switch up the toppings or sneak in some extra flavors, there’s plenty of room to customize these no-bake treats to suit your taste!
- Crunchy Swap: I love using different candy bar varieties in place of Butterfinger—chopped Heath bars or crispy Twix add a fun twist and keep that amazing crunch.
- Nut-Free Version: To accommodate allergies, try sunflower seed butter instead of peanut butter, and use gluten-free graham cracker crumbs for a safe, yummy treat.
- Seasonal Flair: Around the holidays, adding festive sprinkles and a pinch of cinnamon or nutmeg to the mixture brings a cozy vibe perfect for sharing at parties.
- Chocolate Choices: Dark chocolate gives a richer coating, but white chocolate can turn these peanut butter balls into a pretty, creamy dessert perfect for special occasions.
Step-by-Step: How I Make Butterfinger Peanut Butter Balls Recipe

Step 1: Cream the Butter and Peanut Butter
Start by softening 4 tablespoons of butter to room temperature. In a large bowl, use a hand mixer or stand mixer to blend the peanut butter and butter together until the mixture is smooth and creamy. This usually takes about 2 to 3 minutes. When combined well, add 1 teaspoon of vanilla extract and mix again just until combined—you’ll notice a lovely rich aroma emerging here.
Step 2: Add the Powdered Sugar and Crunch
Lower the mixer speed and gradually add 1 cup of powdered sugar, scraping down the sides of the bowl to keep everything incorporated evenly. Next, gently fold in ¾ cup graham cracker crumbs and ½ cup crushed Butterfinger bars using a spatula. This creates a perfect balance of sweet and crunchy textures that will form the base of your balls.
Step 3: Shape the Peanut Butter Balls
Line a baking sheet with parchment paper to keep things tidy. Scoop the dough using about 1 to 1½ tablespoons per ball, then roll each scoop between your palms to create smooth, even spheres. Arrange them spaced apart on the sheet. This step is a great chance to involve kiddos for some fun, hands-on prep!
Step 4: Chill the Balls to Firm Up
Place the baking sheet in the freezer and let the peanut butter balls chill for 30 minutes or until they feel firm to the touch. This is key to making sure they hold their shape when you dip them in chocolate.
Step 5: Melt the Chocolate Coating
In a microwave-safe bowl, melt 8 ounces of chocolate bark or chips in 30-second bursts at 50% power, stirring well between intervals. Keep a close eye on it—the chocolate should melt smoothly without overheating or burning. Once melted, the silky chocolate is ready to give your peanut butter balls that irresistible outer shell.
Step 6: Dip and Decorate Your Balls
Using a fork or dipping tool, carefully dip each chilled ball into the melted chocolate. You can fully coat them or dip just halfway for a pretty two-toned look. Right after dipping, while the chocolate is still soft, sprinkle extra crushed Butterfinger bars, a pinch of coarse sea salt, or festive sprinkles on top for that perfect finishing touch.
Step 7: Let the Chocolate Set
Place the coated balls back onto the parchment-lined sheet and allow the chocolate to harden completely at room temperature, which usually takes about 15 to 20 minutes. Once set, your Butterfinger Peanut Butter Balls are ready to enjoy or store for later.
Top Tip
These tips come from my own kitchen adventures with the Butterfinger Peanut Butter Balls Recipe — little tricks that make all the difference between a good treat and an unforgettable one!
- Choose the Right Peanut Butter: I always go with regular creamy peanut butter like Jif or Skippy because the “natural” kinds tend to separate, making the mixture tricky to work with.
- Freeze, Don’t Refrigerate Before Dipping: Freezing the balls for a full 30 minutes ensures they firm up perfectly; refrigerating doesn’t chill them quite enough, and the chocolate can slide off during dipping.
- Melt Chocolate Gently: Heating chocolate at 50% power in short bursts and stirring helps avoid scorching, which can ruin the glossy smooth coating we all love.
- Decorate Quickly: Sprinkle toppings right after dipping while the chocolate is still wet—waiting too long makes it hard for the toppings to stick.
How to Serve Butterfinger Peanut Butter Balls Recipe

Garnishes
While the crushed Butterfinger bars sprinkled on top add great crunch and continuity, you can also try festive sprinkles for holiday cheer or a light dusting of coarse sea salt to beautifully balance the sweetness. If you’re feeling fancy, drizzle some extra melted chocolate in thin lines over the coated balls to create a fun two-tone effect.
Side Dishes
These peanut butter balls are a perfect party treat on their own, but pairing them with a cold glass of milk or a cup of rich coffee amplifies the experience. If you’re serving a dessert platter, add fresh fruit like strawberries or sliced apples for a refreshing contrast to the sweet and crunchy bites.
Make Ahead and Storage
Storing Leftovers
Store leftover Butterfinger Peanut Butter Balls in an airtight container at room temperature for up to 3 days. If your kitchen is warm, the refrigerator can help keep them firm but may slightly affect the texture of the chocolate coating.
Freezing
These treats freeze beautifully! Simply place the balls in a single layer on a parchment-lined tray and freeze until solid. Then transfer to a freezer-safe container or bag. They keep well for up to 3 months. When ready to enjoy, thaw in the refrigerator for a few hours or at room temperature for about 30 minutes—resisting the urge to eat them frozen ensures the best texture and flavor.
Reheating
Since these are no-bake, “reheating” isn’t necessary. But if you want to slightly soften the chocolate coating for a fudgier bite, let the balls sit at room temperature for 15-20 minutes before serving.
Frequently Asked Questions:
Natural peanut butter tends to separate and can make the mixture too oily or crumbly. For best results and texture, stick to regular creamy peanut butter like Jif or Skippy.
You can use chocolate bark or chocolate chips. For a richer taste, dark chocolate chips or bark are excellent, but milk chocolate works perfectly and gives a sweeter contrast to the peanut butter center.
Absolutely! These peanut butter balls freeze very well. Prepare them in advance, freeze, and then thaw when you’re ready to serve. Perfect for holidays or parties.
Chill the peanut butter balls in the freezer for at least 30 minutes until firm before dipping. This helps the chocolate harden quickly and stay in place without sliding off.
Final Thoughts
I’ve found that the Butterfinger Peanut Butter Balls Recipe is one of those effortless goodies that brings smiles every time. Whether you’re making these for a casual family gathering or a festive celebration, the combination of creamy peanut butter, crunchy Butterfinger, and luscious chocolate will have everyone asking for seconds. Give this recipe a try—you’ll love how simple it is to create a memorable treat with minimal fuss!
Print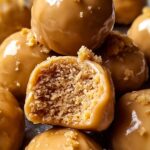
Butterfinger Peanut Butter Balls Recipe
- Prep Time: 20 minutes
- Freezing Time: 30 minutes
- Cook Time: 0 minutes
- Total Time: 50 minutes
- Yield: 24 balls 1x
- Category: Snack
- Method: No-Cook
- Cuisine: American
- Diet: Vegetarian
Description
Butterfinger Balls are a quick and easy no-bake treat combining creamy peanut butter, crunchy Butterfinger bars, and a smooth chocolate coating. These delightful bite-sized balls are perfect for holidays, parties, or anytime you want a sweet and crunchy snack with minimal effort.
Ingredients
Base Ingredients
- 4 tablespoons butter softened
- 1 teaspoon vanilla extract
- 1 cup peanut butter (avoid all-natural varieties that separate)
- 1 cup powdered sugar
- ¾ cup graham cracker crumbs
- ½ cup crushed Butterfinger bars
Chocolate Coating and Toppings
- 8 ounces chocolate bark or chocolate chips for coating
- Optional: extra crushed Butterfinger bars, festive sprinkles, coarse sea salt for topping
Instructions
- Mix the Base: In a large bowl, use a hand or stand mixer to cream together the peanut butter and softened butter until smooth. Add vanilla extract and mix until combined.
- Add Sweetness and Crunch: Gradually mix in the powdered sugar at low speed, scraping the sides of the bowl as needed. Fold in graham cracker crumbs and crushed Butterfingers until the mixture is evenly combined.
- Form the Balls: Line a baking sheet with parchment paper. Scoop about 1 to 1½ tablespoons of the dough and roll into balls. Place them spaced apart on the sheet.
- Chill to Set: Freeze the formed balls for 30 minutes or until completely firm.
- Melt the Chocolate: In a microwave-safe bowl, melt the chocolate bark or chips in 30-second intervals at 50% power, stirring between bursts until smooth. Be careful not to overheat.
- Dip and Decorate: Dip each chilled ball in the melted chocolate—either fully or halfway. Immediately top with additional crushed Butterfingers, sea salt, or sprinkles before the chocolate sets.
- Let Them Set: Allow the chocolate coating to harden completely before serving or storing.
Notes
- Use regular peanut butter (like Jif or Skippy) for the best consistency.
- For a deeper chocolate flavor, use dark chocolate chips or bark.
- These freeze beautifully—great for make-ahead treats during holidays or special occasions.
- Try dipping only halfway for a two-tone look or drizzle extra chocolate over the tops once set.
Nutrition
- Serving Size: 1 ball
- Calories: 125 kcal
- Sugar: 9 g
- Sodium: 55 mg
- Fat: 9 g
- Saturated Fat: 4 g
- Unsaturated Fat: 5 g
- Trans Fat: 0 g
- Carbohydrates: 9 g
- Fiber: 1 g
- Protein: 2 g
- Cholesterol: 12 mg


Leave a Reply